As a Shopify store owner, it is crucial to have a streamlined process for exporting orders from Shopify because it allows you to keep an accurate record of your orders, backup orders, better manage fulfillment and delivery service and analyze sales trends. Shopify provides a simple feature that allows you to manually export orders to a CSV file from the Orders page of your Shopify admin. Still, this option has some limitations. For more advanced and customizable Shopify data export, you may need to consider the Shopify data export & reporting app like Exportier - Data Export from Alpha Serve.
In this guide, we'll show you how to export Shopify orders, so you can easily access your data and use it to make better business decisions. We'll also discuss the various types of order data you can export and provide helpful tips and best practices for ensuring a successful order export.
Why Exportier - Data Export
Before moving on to how to use Exportier - Data Export for advanced Shopify orders export, let's look at its main features.
Manage Unlimited Shopify Orders Export
Exportier - Data Export allows you to export Orders from your Shopify store with their complete data. Unlike Shopify's native export, where some essential fields, like customer's currency, for example, are unavailable, Exportier allows you to select and export any field or set of fields, apply filters, and even define the order of the columns in the exported file. Order data is divided into easy-to-navigate groups, and each field has a description for your convenience.
You can select fields from the following data groups:
- Orders/Customers
- Orders/Fulfilments
- Orders/Transactions
- Orders/Refunds
- Orders/Metafields
- Orders/Disputes
Find the complete list of available Shopify fields with a detailed description in the documentation.
Schedule Automatic Orders Export
For those needing to conduct data export regularly, having an automated scheduled export can be an invaluable time-saver. Exportier provides an export scheduler that allows you to configure a daily, weekly, or monthly data export to an Excel or CSV file.
Export criteria can be configured in advance, enabling you to export data at a specified time and ensuring more efficient and timely data preparation. Thus, the required data export will be performed at the appointed time, eliminating the need for manual intervention.
Set Up Google Drive and FTP Integration
Exportier - Data Export allows you to store reports within the application or download them as CSV/Excel files. For those who wish to have access to their exported data from anywhere, integration with Google Drive or an FTP server is the recommended approach.
You can set this integration directly from the Exportier - Data Export settings page, thus allowing users to quickly and easily access their data without hassle.
Save Time With Ready-Made Export Templates
Exportier - Data Export offers a convenient way to structure and manage data export needs. The app comes with a set of pre-defined templates that cover the most popular combinations of data sets. These templates can be used as is, edited, or new templates can be created and saved based on the user's requirements.
Importantly, these templates are custom-designed to provide best practices for data export and analytics and are based on the most commonly requested export formats. By leveraging these templates, you can avoid starting from scratch when creating reports, thus saving valuable time and resources.
Get Notified By Email When Orders Export Is Ready
By enabling Email notifications, you will be able to receive timely alerts when the data is ready for export. These notifications can be handy for those relying on the data for their analysis, ensuring they are aware when it is ready.
Furthermore, this feature can be beneficial in eliminating any delays or inadvertent errors that can occur when data is not ready for use at the expected time.
4 Steps Guide On How To Export Shopify Orders
You must complete four steps to create your first Shopify orders export using the Exportier - Data Export app. Let's get started!
Step 1. Install Exportier - Data Export
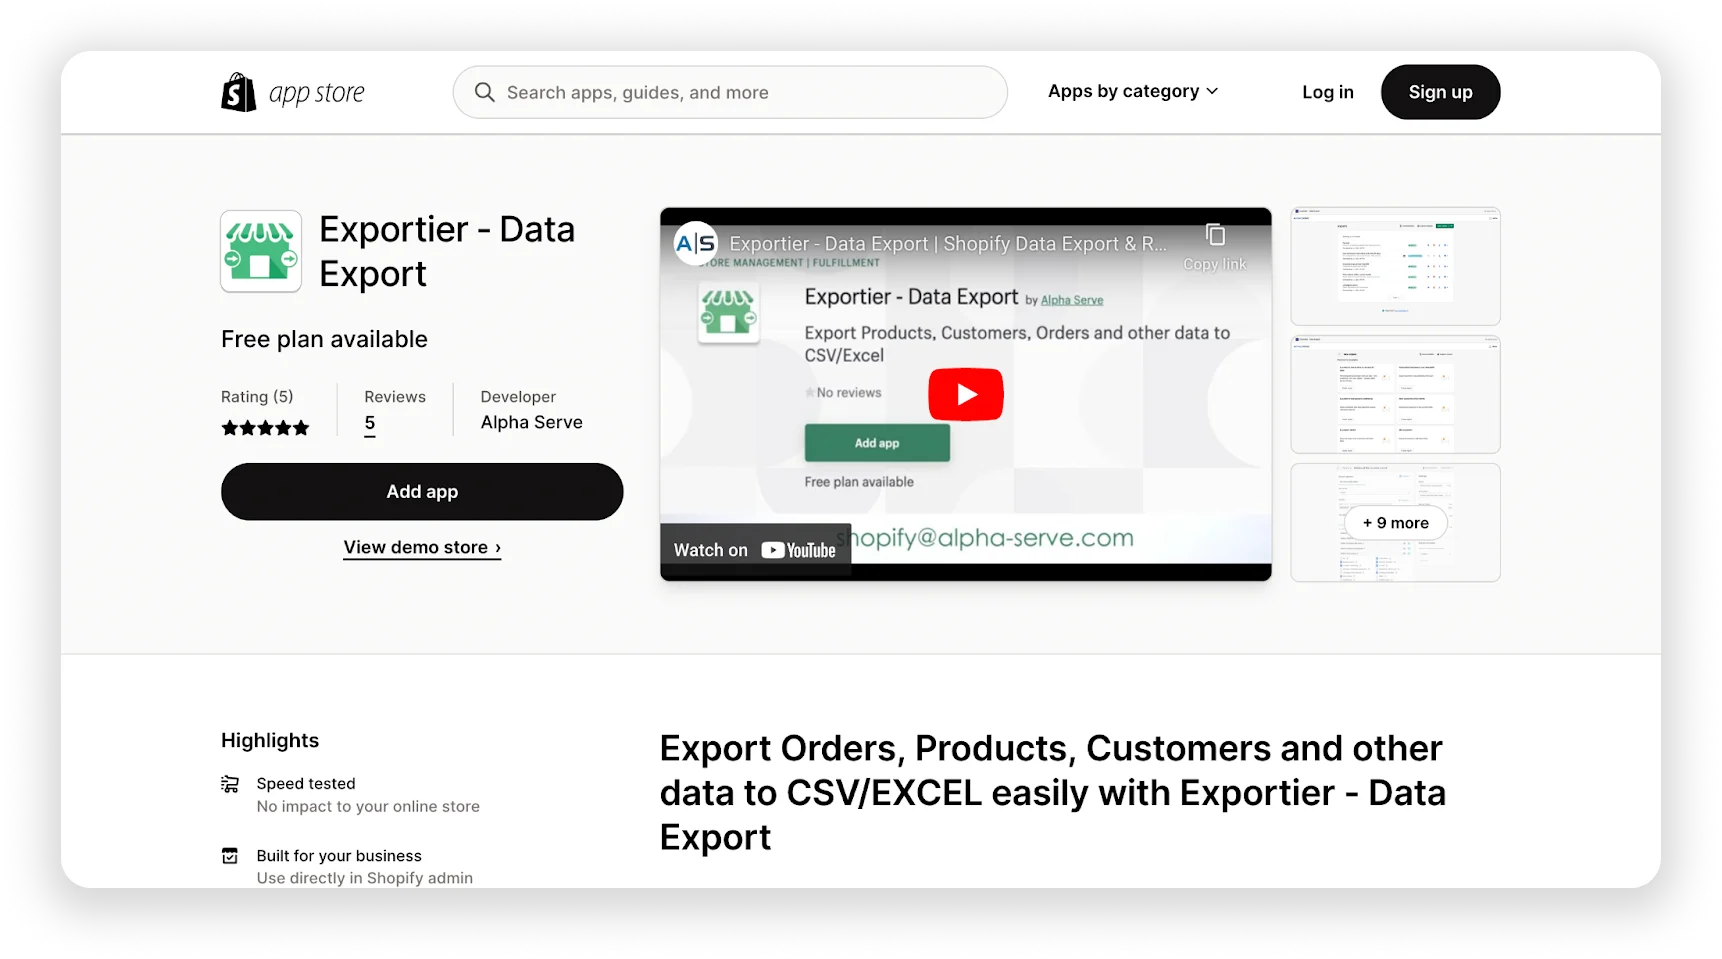
To successfully follow the instructions outlined in this part, having the appropriate Shopify account rights is essential. To begin Exportier - Data Export installation, first navigate to the app listing page on the Shopify App Store and click the Add app button.
You will be redirected to the Confirmation page, where all details must be read before clicking the Install app button. The application will be automatically installed on your Shopify store after successfully completing the installation process.
At that point, you can begin exporting the data you require.
Step 2. Configure Shopify Orders Export
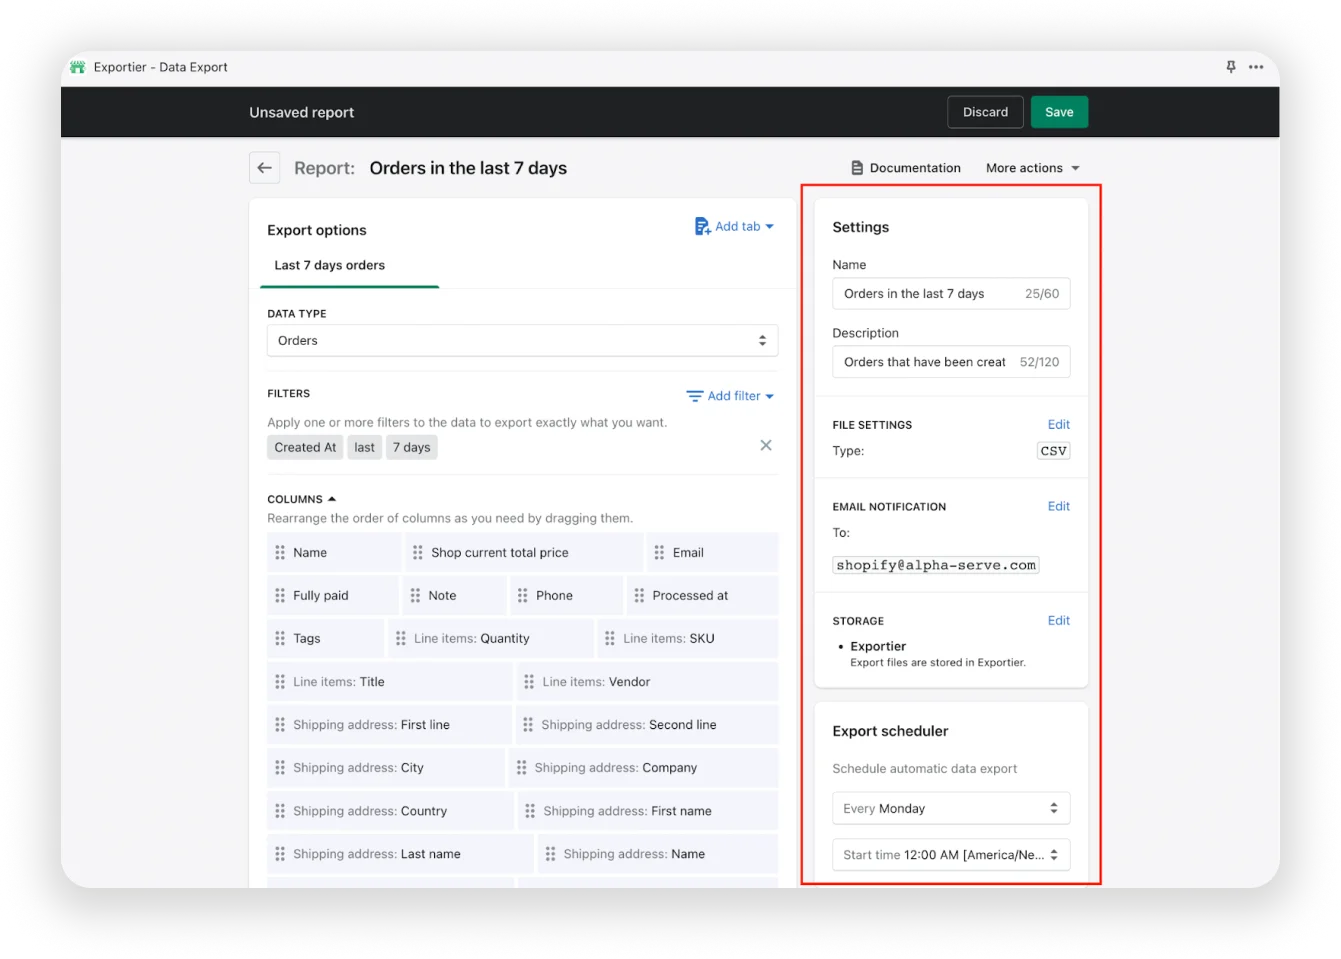
From your Shopify admin, navigate to Apps > Exportier - Data Export. Click the New Report button. The export settings page opens. Go to the Settings section on the right side of the screen.
Here you need to set the following:
1.Enter a name and description for the report in the corresponding fields.
2.Select the file type for the report: CSV or Excel.
3.Enable email notification to get notified when the data preparation is ready. You can add multiple emails if needed.
4.Set up storage options. Click "Edit" and choose where to store the reports: on Google Drive or an FTP server.
5.Configure the Export scheduler by selecting the desired recurrent period and start time for your export (daily, weekly or monthly).
Step 3. Select Orders Data To Export
Now let's move on to selecting specific fields for export.
1. Select the Data Type - Orders.
2. Apply one or more filters to export the exact data that you want. You can filter your Orders export by using different criteria such as:
- Cart token
- Created at
- Delivery method
- Discount code
- Email
- Financial status
- Fulfillment status
- Name
- Processed at
- Risk level
- Source name
- Status
- Tag
- Updated at
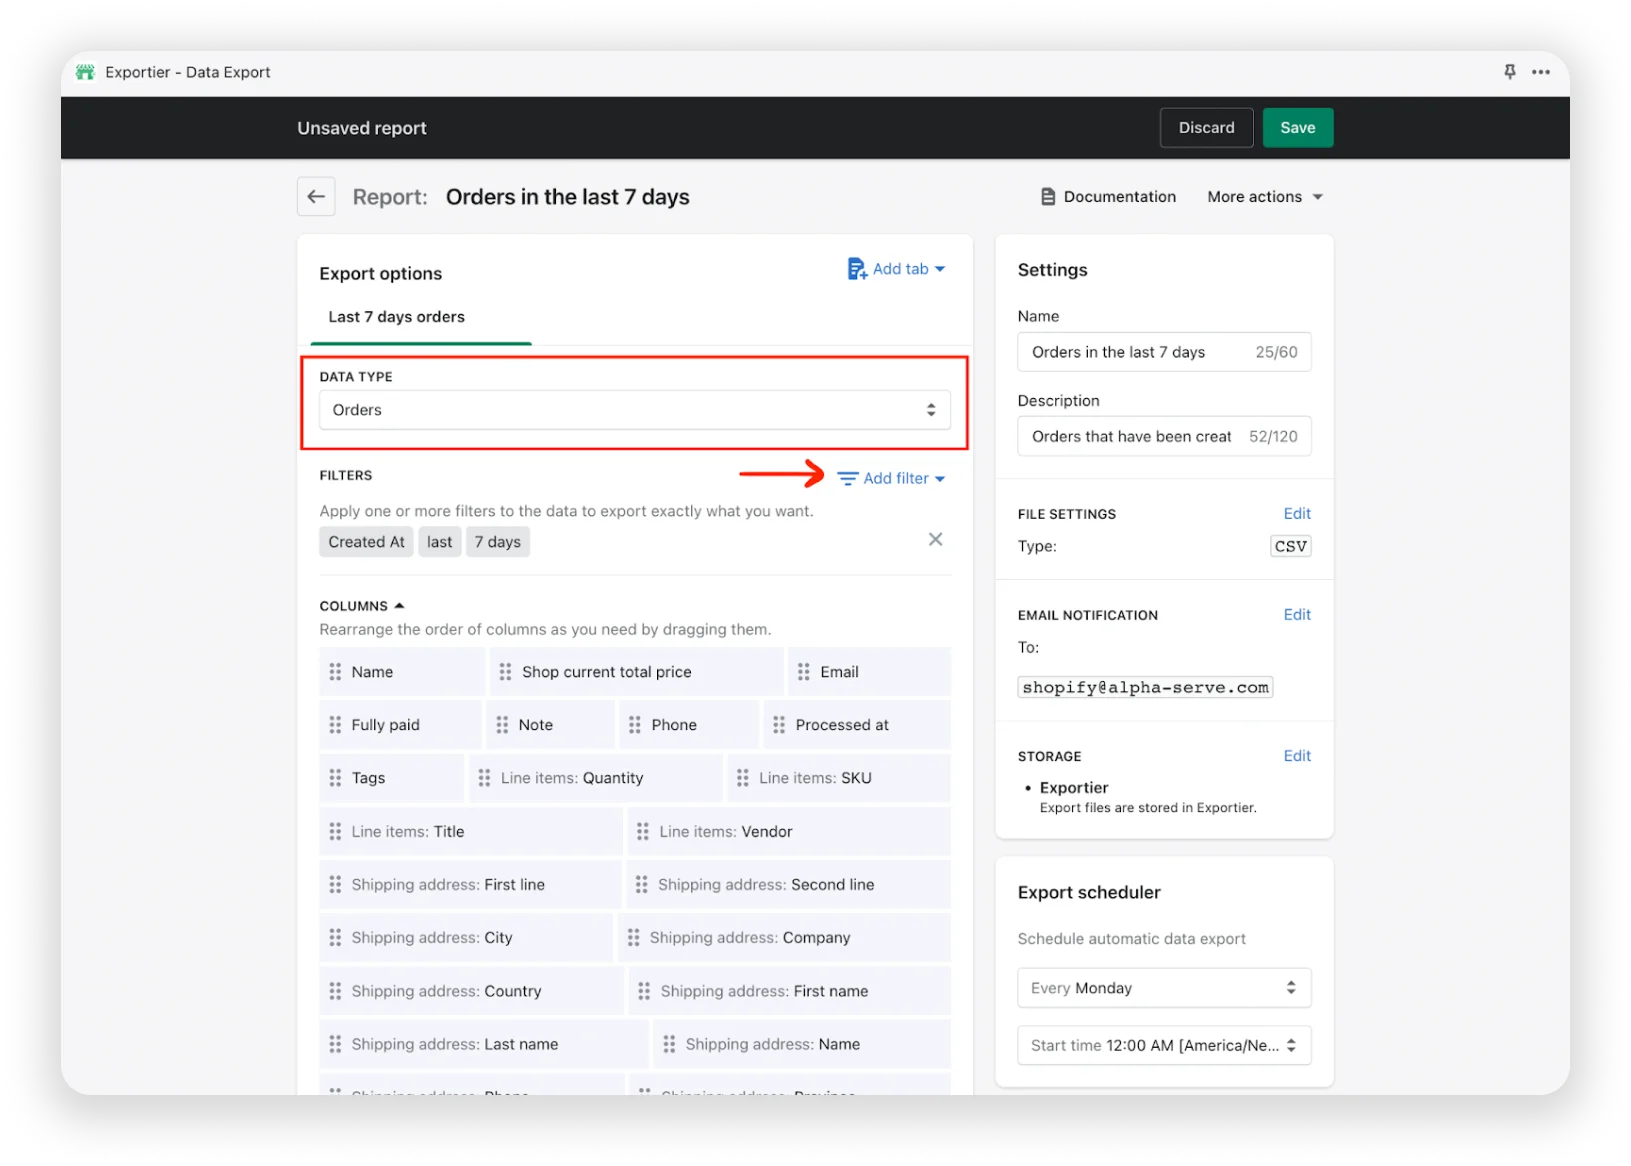
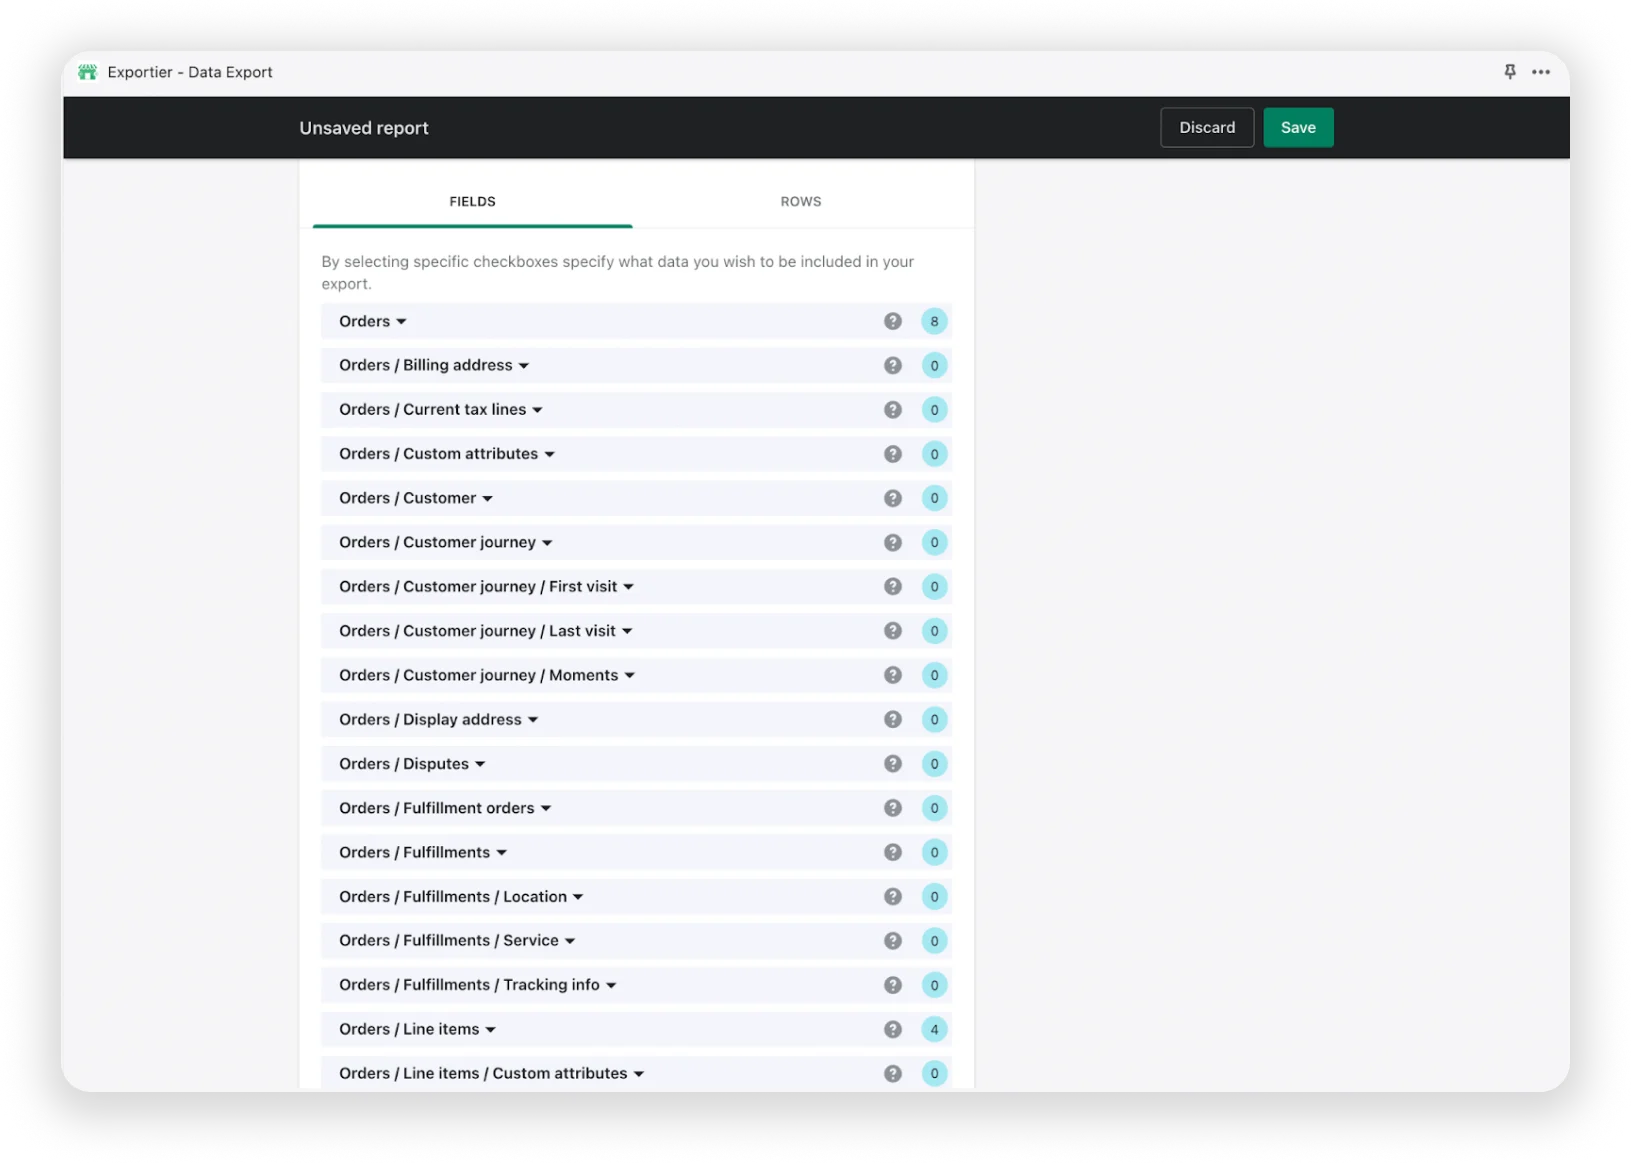
3. Select the fields you want to export by checking the appropriate boxes next to the field. Click Save to confirm and save the configured data export.
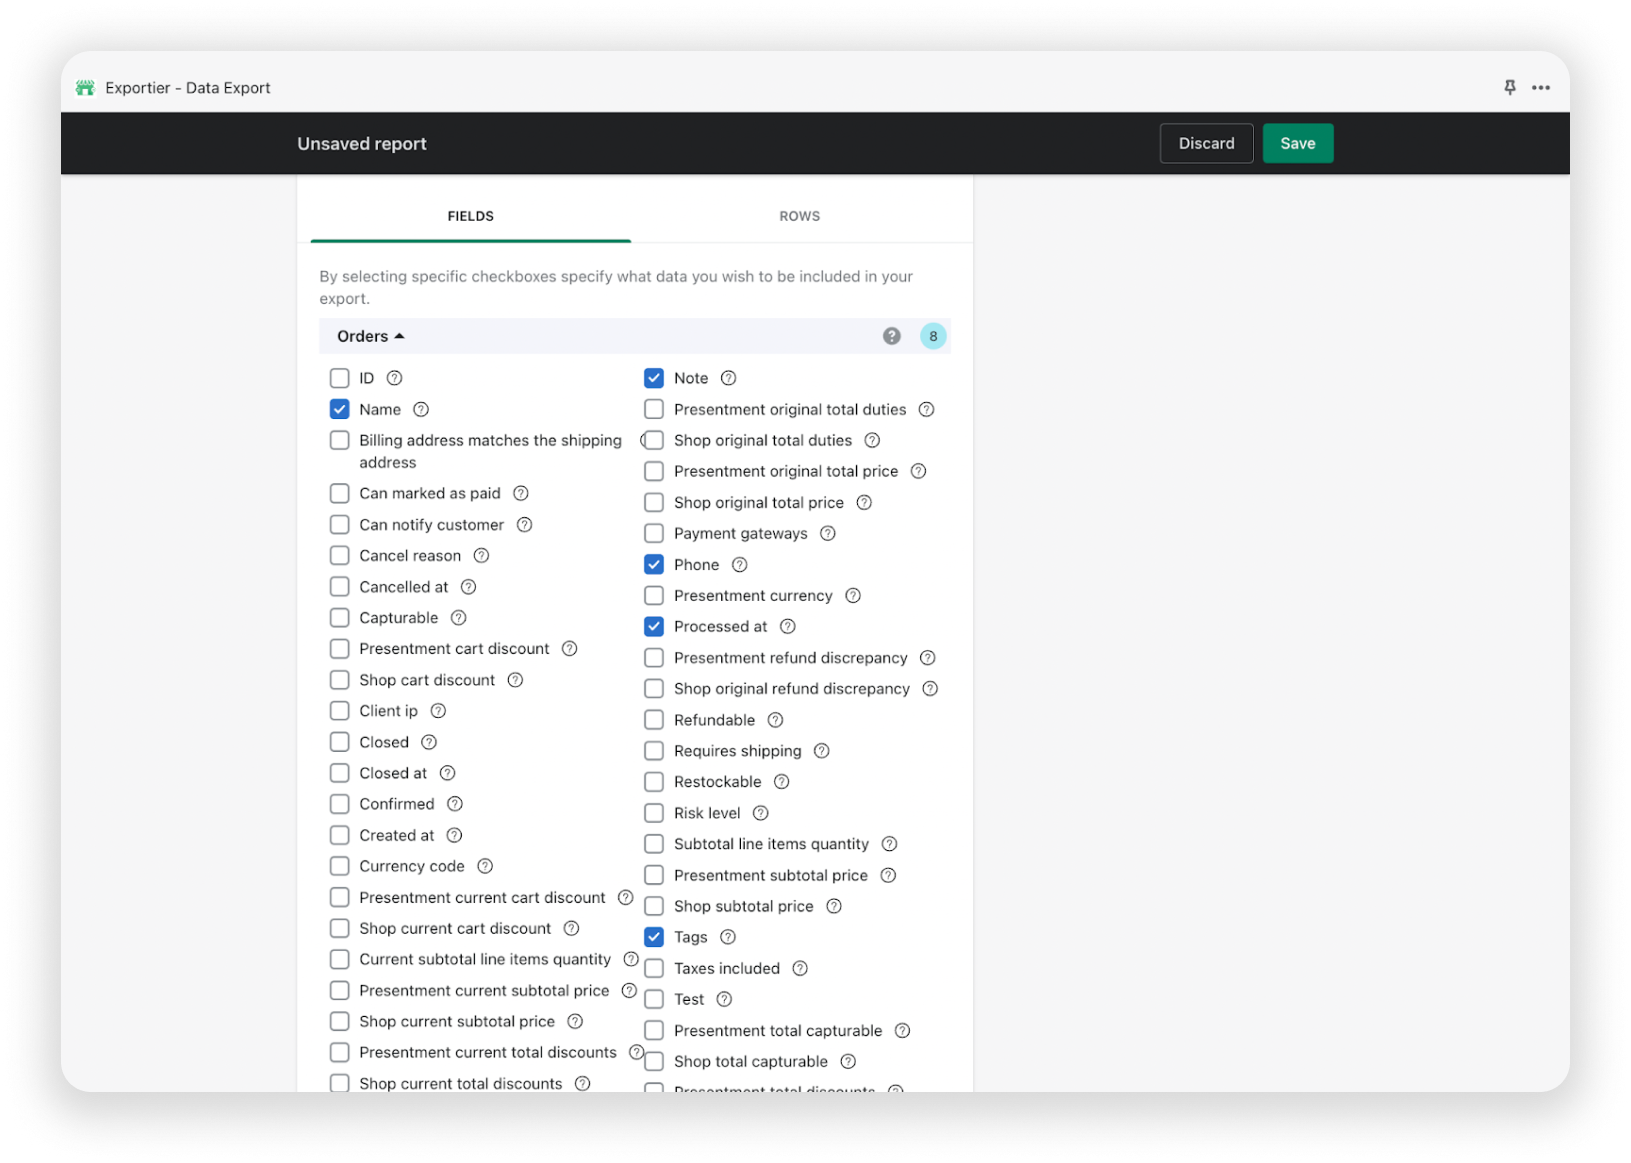
All data related to orders are divided into groups of fields. Such a structure will allow you to quickly navigate through many fields and select only those that you need for a particular export.
At the moment, more than 30 data groups are available, among which you will find:
-
Orders / Customers: find all fields related to the customer who placed the order, such as ID, First name, Last name, Email, Phone, State, and other customer-related fields.
-
Orders / Fulfillments: list of shipments for the order where you will find the fulfillment ID, Name, Created at, Delivered at, status, etc.
-
Orders / Transactions: list of all transactions associated with the order where you can find a transaction ID, payment method, amount, currency, status, and more.
Follow this link to find the complete list of available Shopify fields for export.
Step 4. Run Shopify Orders Export
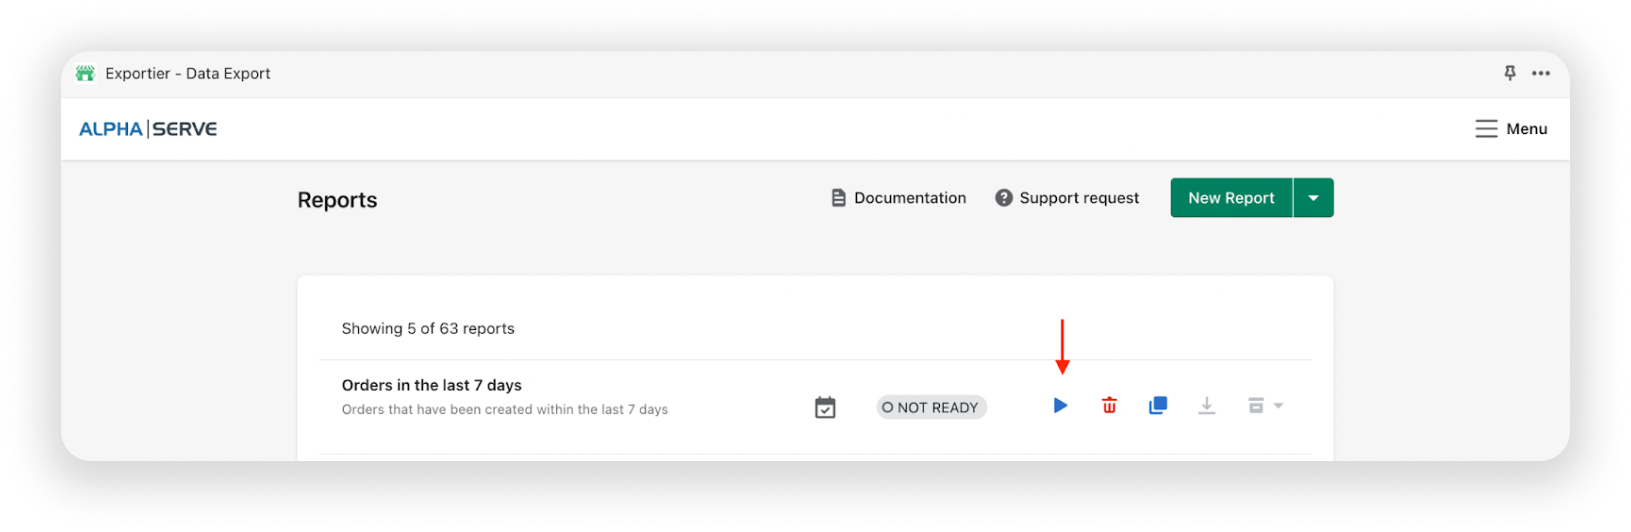
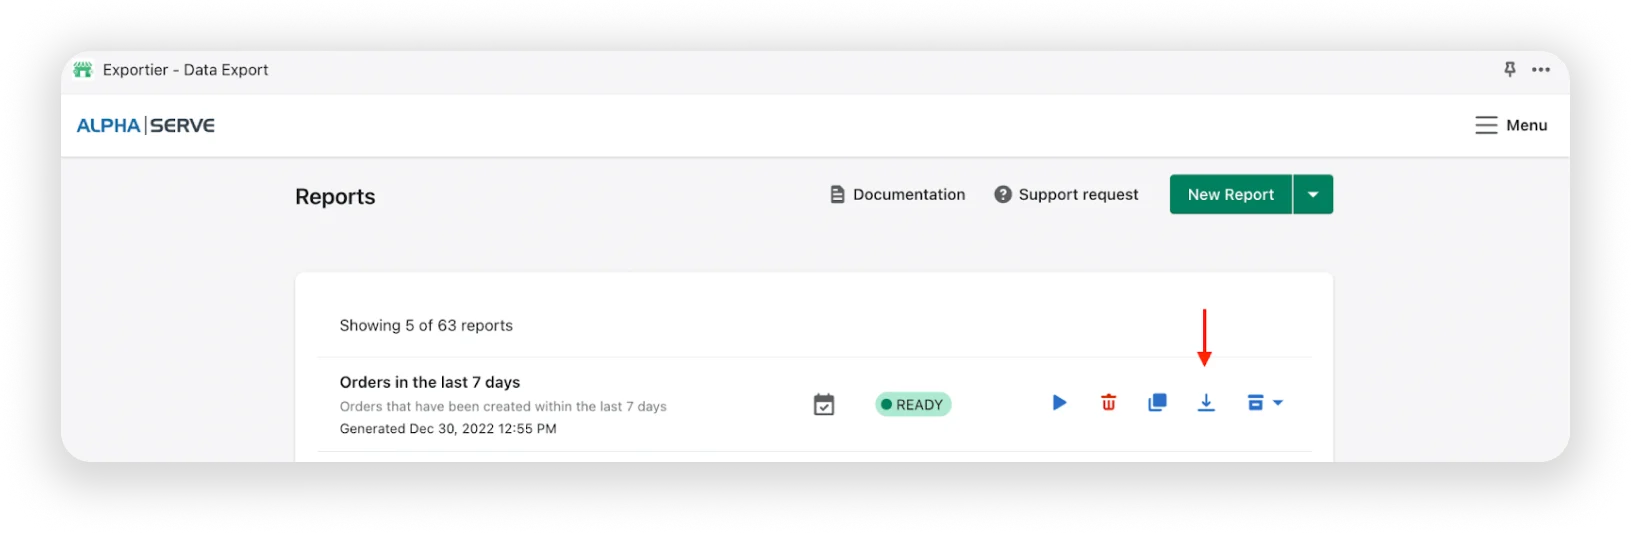
Once the order export report has been successfully created, you need to navigate to the Reports page, where your newly created report will appear with a "Not Ready" status. To generate the export file, click the Run button, and the status will change to "Pending" and then to "In Progress".
Once the process is complete, the status will change to Ready, and you'll be able to download your report, containing all the data configured in the initial step. To download the report, click on the Download action.
Use Report Templates to Export Orders from Shopify
The Exportier - Data Export app provides an array of pre-built templates that can help effectively manage Shopify orders export. These templates are designed to make the export process more efficient and to reduce the manual labor associated with repetitive export tasks. You may make minor template adjustments or create your own custom templates for recurrent exports. Furthermore, these templates are regularly updated to ensure access to the most up-to-date export techniques and processes.
You can export Shopify orders instantly using the following templates:
-
Orders in the last 7 days: export all orders created within the previous 7 days.
-
Orders from yesterday: export all orders created yesterday.
-
Orders of the current month: export orders created in the current month.
-
Unfulfilled orders: export orders with fulfillment status of null or partial.
-
Unshipped orders: export orders that still need to be shipped.
-
Unpaid orders: export orders that have yet to be paid.
-
All orders: export all orders with basic fields.
-
Customer orders: export all orders of all customers with basic fields.
-
Orders fulfillments: export the list of all shipments by orders.
How to Start with Reports Templates
To create a new report from a template, click the Create from template button on the start page.
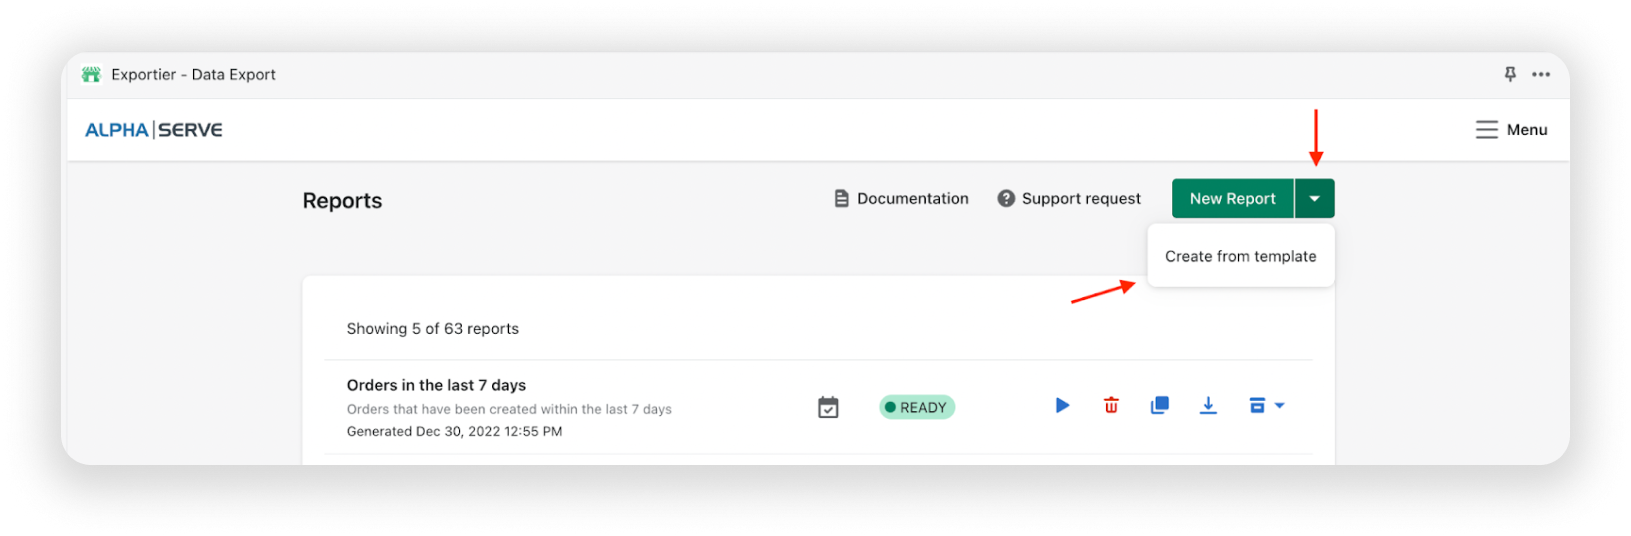
You will be redirected to the Templates page. Here, select the appropriate template and click the Create report button.
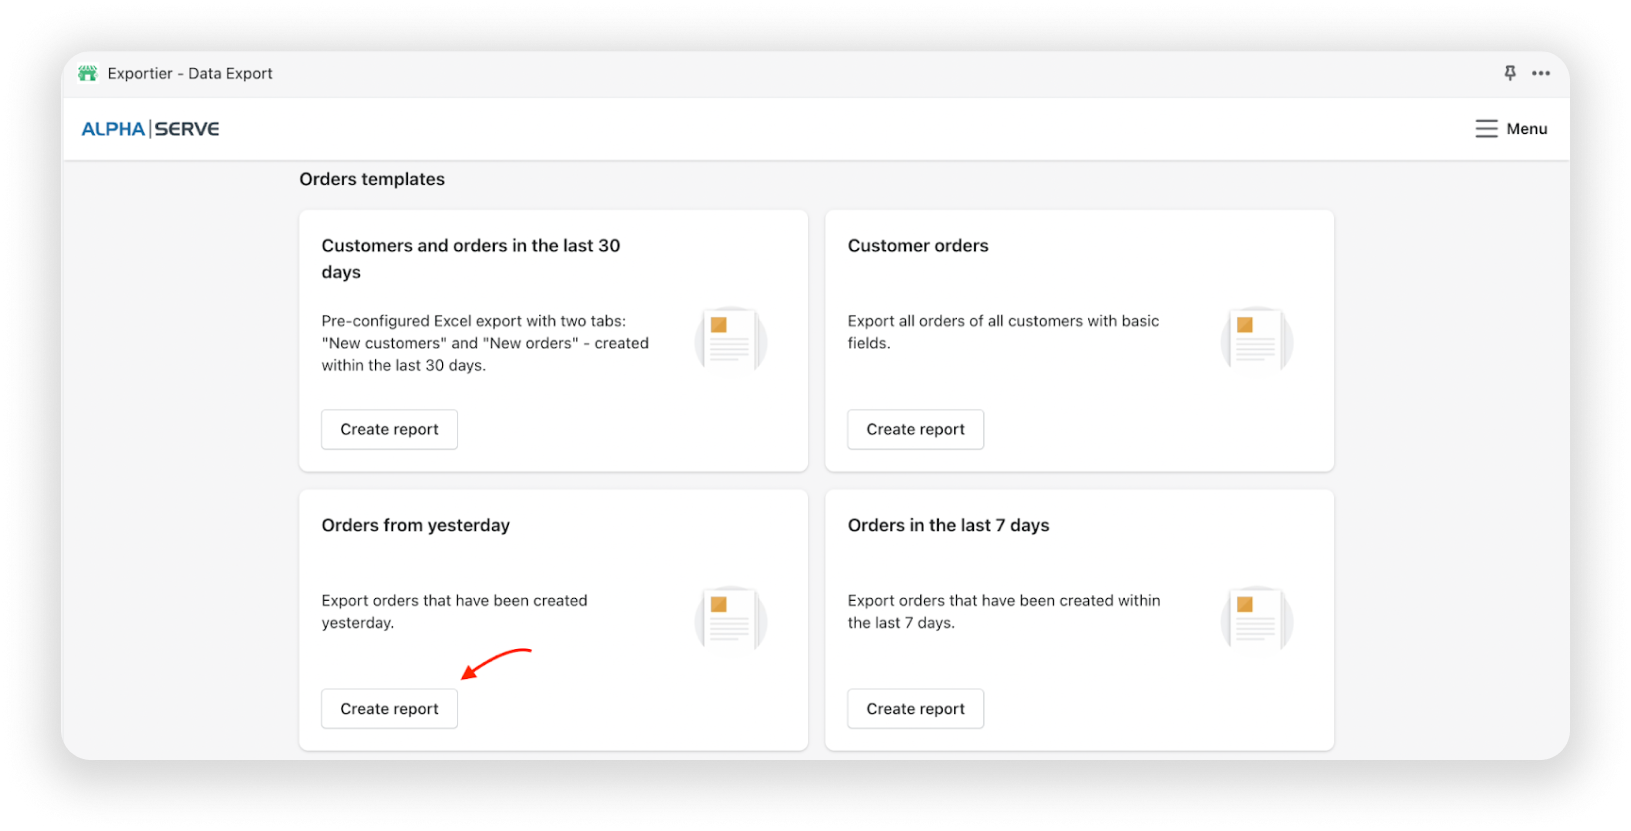
This action turns you to the Report settings form with pre-defined fields and filters, which you can customize according to your preferences and requirements.
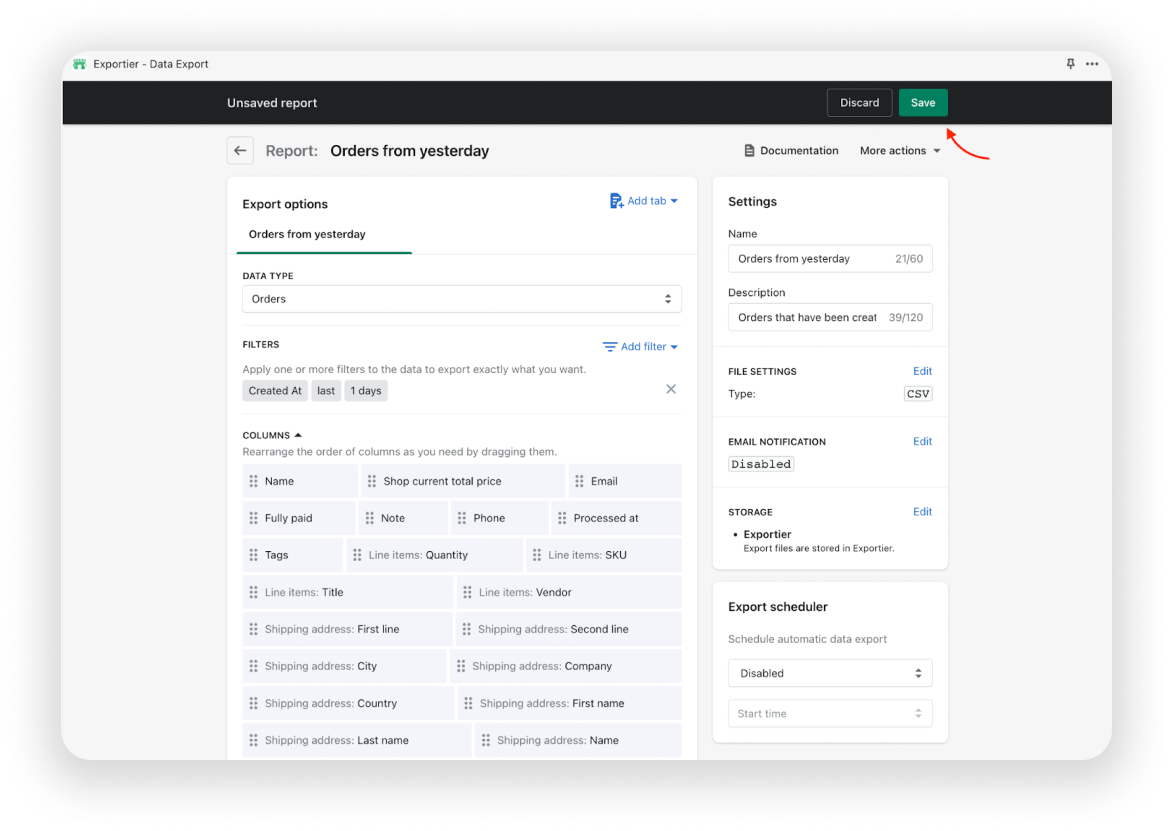
Now just Save the report and follow the steps described in Step 4. Run Shopify Orders Export.
Final Words
In conclusion, the Exportier - Data Export is an advanced tool for exporting orders from Shopify. It allows you to customize your export settings and export Shopify orders more efficiently. The ability to export orders on a daily, weekly, or monthly basis provides enough flexibility for businesses of any size. Try it out today and see how it can help maximize your order export process.